Tuesday, June 28, 2011

Funnel Cake and Fried Oreos

Don't you just love carnival food? You know the kind of food we're talking about - deep fried and smothered in chocolate! Funnel cakes are so simple to make, and you probably have all the ingredients you need right in your pantry. Even better - the fried Oreos are made with the left-over batter from the funnel cakes. We got the Oreo idea when we visited Scotland a few years ago and the fish-n-chips shops served a plethora of fried items - fried pizza, fried cheeseburgers, and even fried candy bars.
This recipe should make 2 12" funnel cakes and have enough batter left over to fry several Oreo cookies.


What you will need:
2 large eggs
1 1/3 cup of milk
1/4 cup + 1 tablespoon granulated sugar
2 1/2 cups all purpose flour
1/2 tsp salt
1/2 tablespoon + 1/2 tsp baking powder
Powdered sugar for dusting
Oil for frying

What you need to do:
Heat oil in an electric fryer or cast iron pan to 375 degrees. You will need at least an inch and a half of oil. We chose to use the electric fryer. Line two or three plates with paper towels. We used paper plates to make clean-up easier.

Mix the eggs and milk together with a wire whisk or fork until combined. Stir in the other ingredients until the batter is smooth.
The next step can be done one of three ways. We used a disposable pastry bag fitted with a round tip. You can use a Ziploc bag and cut a small hole in one corner or you can use a funnel that has a small hole. If you don't have a pastry bag and a small round tip we recommend using a Ziploc bag and cutting a small portion of the corner off. The batter is rather soupy and will pour out very fast.
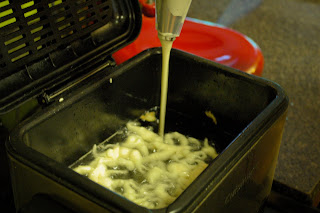
Stream the batter into the oil in a random, overlapping pattern (crossing the batter back and fourth over itself will make the process of flipping the funnel cake much easier.
Once the cake is floating and golden brown on the bottom (about 60 seconds) use tongs to flip it over, allowing the other side to cook.
Continue cooking until your desired "doneness" is achieved, remove from oil, and set on a paper towel lined plate.
Liberally apply powdered sugar on top. Some people like to add a fruit topping, but we made a sweet glaze using 2 tablespoons plain Philadelphia cooking cream, 2 tablespoons milk, 1/2 cup powdered sugar, and 1 tsp vanilla flavoring.

Now for the fun part - Fried Oreo Cookies!
First, line a plate with paper towels to get ready to drain the fried cookies. You'll also need a wet towel to clean your fingers. Next, dip your Oreo cookies in the batter. You can put three or four in the batter at a time to make it go even faster.
Roll, flip, rotate, etc. the cookie in the batter until it is completely covered. Yes, it will get messy!
Drop the battered cookies in the hot oil and cook until golden brown. This will not take long - less than a minute for each side.
When they finish cooking, drain on a paper towel lined plate and sprinkle with powdered sugar. Eat them while they are still warm - YUM!
These are so good you won't know what hit you!!


Sunday, June 19, 2011

Emeril Lagasse Inspired Jalapeno Crab Dip

This recipe originally came to us from Stephen's Aunt JoAnn a couple of years before she lost her battle with cancer. It also introduced us to Emeril Lagasse and The Food Network. We have changed it around slightly to fit our taste, but it still makes us think of Aunt JoAnn and her delicious kitchen creations.


A major difference between our recipe and Emeril's original recipe is the crab meat. Where Emeril uses fresh crab, we use imitation crab. The last time Stephen ate fresh crab meat he had an allergic reaction so we have tried to avoid it ever since.

What you will need:
1 pound of fresh or imitation crab
1 tsp minced garlic
1/2 cup chopped pickled jalapenos, grated (*We actually use 1/4 cup of the juice from a jar of jalapenos and just a few chopped pieces)
1/4 pound pepper jack cheese, grated
1 tsp Worcestershire sauce
1 tsp hot sauce (we use Tobasco)
1/2 tsp salt
1/2 cup mayonnaise
2 ounces Parmesan cheese, grated (*We use Parmigiano-Reggiano)

What you need to do:
Preheat the oven to 350 degrees. If you are using imitation crab you will need to separate or chop the meat into smaller chunks. To save time and dishes mix all your ingredients in a small casserole dish. We used a 9x9.
Grate the pepper jack cheese into the dish.
Add garlic, jalapenos, pepper jack cheese, Worcestershire, hot sauce, salt, and mayonnaise. Mix all ingredients together and distribute mixture around the dish.
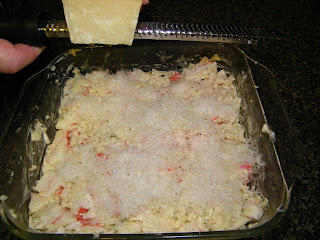
Sprinkle the Parmesan cheese evenly on the top of the crab mixture. *We actually grate the cheese directly over the crab mixture.
Bake until golden brown and bubbly, about 25 minutes. Remove from the oven and let sit for about 5 minutes before serving.
This dip is great with tortilla chips, buttery crackers, or baguette slices toasted with olive oil, sea salt, and freshly ground black pepper (our personal favorite).

Boy #2 really likes the Crab Dip!

Friday, June 17, 2011

S'mores Cupcakes

Who doesn't love a warm gooey treat from time to time? We do! S'mores were created around the turn of the 20th Century - about the same time that commercial marshmallows were becoming popular. The marshmallows traveled well, as did graham crackers and chocolate bars, making them good snacks to take on vacations and camping trips. The marshmallows were easily warmed over the campfire which, combined with the chocolate and graham crackers, made for a delicious treat in situations where other desserts would have been more difficult to make.
The first recorded version of the S'mores recipe appeared in the 1927 Girl Scout handbook entitled Tramping and Trailing with the Girl Scouts. The recipe was featured in various Girl Scout publications until at least 1971. Folklore tells us that the name "S'mores" came about because everyone who tasted them wanted "some more."
The publication of the S'mores recipe was not the first time chocolate, marshmallows, and graham crackers were paired. The Mallomar Cookie was introduced in 1913 followed by the Moon Pie in 1917. The following recipe combines all the delicious ingredients of S'mores with rich Devil's Food Cake to make a treat that is sure to be a hit with your family!


What you will need:
For the crust
1 1/2 cups graham cracker crumbs
1/4 cup sugar
5 1/3 tbsp unsalted butter, melted
8oz. bittersweet chocolate, finely chopped


For the cake
1 box Devil's Food cake mix - we used Pillsbury
1 1/2 cup water
1/4 cup oil
3 eggs
(the cake ingredients may vary according to the directions on the back of the box)

For the frosting:
8 large egg whites, at room temperature
2 cups sugar
1/2 tsp cream of tartar
2 tsp vanilla extract (we used clear)

What you need to do:
Preheat your oven to 350. Melt your butter in the microwave for 30 seconds. Line two cupcake pans with paper liners. *We only have one cupcake pan so we had to bake in two cycles. If you have whole graham crackers crush enough to make 1 1/2 cups of crumbs. Chop your 8oz bittersweet chocolate bar (if you have the Ghiradelli brand you will need 2 - 4oz bars).
In a small mixing bowl, combine the graham cracker crumbs, sugar, and melted butter; mix well with a fork.
Drop about 1 tablespoon of the graham cracker mixture in the bottom of each cupcake liner and press down. *We used the back of our 1/4 measuring cup.
Sprinkle a small amount of the chopped chocolate on top of the graham cracker crusts. Bake for 5 minutes then remove from the oven. *Leave the oven at 350 after you remove the pan.
Make the cake batter according to the directions on the box. Divide the batter evenly between the prepared cupcake liners.

Return the pan to the oven and bake according to the directions on the box (about 18-22 minutes), rotating the pan halfway through baking. *We only baked for 18 minutes. Allow the cupcakes to cool in the pan for 5-10 minutes, then transfer to a wire rack to cool.
While the cupcakes are cooling thoroughly wash and DRY your mixer bowl to remove any oily residue the batter may have left behind. *The oil will effect the consistency of the frosting.

*The frosting recipe calls for you to use a double boiler. We do not have a double boiler and probably wouldn't have used one anyway - that's just more to clean up later. We just set our clean, dry mixer bowl over a pot of simmering water.
If you have not already separated your eggs, do that now.
To make the frosting, combine the egg whites, sugar, and cream of tartar in a bowl. Then pour into your "double boiler."
Heat the mixture, whisking frequently, until it reaches 160 degrees. *You can use a candy thermometer, but who has one of those things? We just used our digital food thermometer.
Once it reaches the proper temperature transfer the mixture, along with the mixer bowl, back to the electric mixer fitted with the whisk attachment. Whisk starting at low speed and gradually increasing to medium-high speed until stiff, glossy peaks form. When the mixture starts to thicken add the 2 tsp vanilla extract.
Now you can frost your cooled cupcakes. *We used a piping bag fitted with a star tip (Wilton size 2D) to get a swirled look. If you don't have a piping bag or star tip a spoon or butter knife works well too.
You can stop here and have pretty cupcakes that taste delicious, however, we browned the tops of our cupcakes to give them a more "toasted marshmallow" look. To do this you will need to put your cupcakes in the refrigerator for at least 10 minutes so the marshmallow frosting will completely set. Now, at this point a professional baker will pull out his kitchen torch. We don't have one of those fancy things so we pulled out our Bic torch we use to light the grill. We gently brushed the flame against the marshmallow swirls to achieve the desired "toastiness."
If you want, you can garnish with a piece of chocolate and/or graham cracker.
These cupcakes are DELICIOUS! They will be perfect for a camping-themed birthday party, a Boy or Girl Scout gathering, or just a fun weekend kitchen project. The marshmallow frosting may seem a bit complicated, but it was actually very easy to make. You can probably just buy a jar of marshmallow cream to achieve a similar effect, but the homemade marshmallow frosting tastes so much better!


Tuesday, June 14, 2011

Creamy Pimento Cheese

Do you like pimento cheese?....not that toxic orange stuff you find in the grocery store....we mean REAL pimento cheese...like the kind your Aunt Rosabell used to bring to the family reunions? The kind that true southern belles call "pumenah." The exact history of pimento cheese is unclear, however, the small, red, heart-shaped pepper was imported from Spain until around 1908 when it took root to become a successful crop in Experiment, Georgia. Therefore, many believe that this creamy delicacy made its debut in Georgia and became very popular all across the south. Why wouldn't it be popular? It's easy to make, it's cheap, and it tastes great! It's even earned national exposure as one of the more popular sandwiches at the Masters Golf Tournament in Augusta, Georgia. Now, enough with the history lesson, let's make some Pimento Cheese!

What you will need:
2 (8 ounce) packages of cream cheese
4 cups shredded extra sharp cheddar cheese
2/3 cup mayonnaise
A dash of garlic powder
2 (4 ounce) jars diced pimientos - or 1 (8 ounce) jar if you can find it

What you need to do:
Beat the cream cheese with an electric mixer until it is creamy. Add the cheddar cheese and continue mixing until it is light and fluffy.
Next, beat in the mayonnaise and garlic powder.
Stir in the diced pimento peppers.
Put the mixture in your most "southern" serving platter. Cover and chill for at least one hour.
See...there's no need to buy that processed orange goo the supermarkets want you to believe is pimento cheese. If you're looking for something a bit lighter use reduced fat cheese and mayo. This one is sure to be a crowd pleaser!

We'll see ya'll later. Say hi to ya mama 'n 'em!